

A simple T-shirt has long been considered a basic wardrobe item. It is very popular among connoisseurs of versatile, comfortable and practical clothing. With regard to sewing, the T-shirt takes a special place here too. It is often the first sewing project with which many begin their way. Lack of skills and rich experience doesn't prevent you from sewing a T-shirt with your own hands. Therefore, in this tutorial, I decided to show how to sew a basic T-shirt and make this process even easier and clearer, especially for those who are taking their first steps in sewing. Below you can find step-by-step guide and detailed sewing video.
Простая футболка уже давно считается базовым предметом гардероба. Она необычайно популярна среди ценителей универсальной, удобной и практичной одежды. Что касается шитья, то футболка и здесь занимает особое место. Она часто бывает первым изделием, с которого многие начинают свой швейный путь. Отсутствие навыков и богатого опыта не мешает сшить футболку своими руками. Поэтому в этом мастер-классе я решила показать, как сшить простую футболку и сделать этот процесс еще легче и нагляднее, особенно тем, кто делаете первые шаги в шитье. Ниже вы можете найти пошаговую инструкцию и подробное видео с пошивом.
You will need:
- Pattern #120 Burda Style 6/2011
- Сotton jersey fabric 0.8 m (I use the remnants of the fabric),
- Interfacing 0,15 cm,
- Kiper tape 1 cm wide in tone to the fabric,
- Thread 4 pcs.
- Выкройка №120 журнал Burda Style 6/2011
- Кулирная гладь 0,8 м (я использую остаток ткани),
- Трикотажный дублерин,
- Киперная лента шириной 1 см в тон к ткани,
- Нитки 4 шт.

1) Выкроите детали футболки.
У вас должна получиться 1 деталь переда, 1 деталь спинки и две детали рукавов.
2) Cut two
strips of interfacing of 1 cm wide and a length equal to the length of the
shoulder allowance. Attach interfacing to the wrong side of the back’s shoulder
allowance with an iron.
2) Из дублерина вырежьте две полосы
шириной 1 см и длиной, равной длине плечевого среза. Приклейте дублерин к
изнаночной стороне плечевого среза спинки с помощью утюга.

3) Fold the
front and back details face to face. Pin the shoulder seams, if you wish, you
can fasten it with a hand seam. Then sew the shoulder seams on the serger.
3) Сложите детали футболки лицом к лицу.
Сколите их по плечевым швам, при желании можете наметать. Затем прошейте плечевые
швы на оверлоке.

4) The free ends of the threads into the seam with a needle with a large hole. Cut
off excess threads.
4) Свободные концы нитей заправьте в шов
с помощью иглы с большим ушком. Излишки нитей срежьте.

5) Iron the
seam towards the back.
5) Шов приутюжьте, а затем заутюжьте на сторону
спинки.

6) In
accordance with the pattern, the t-shirt doesn't have the the
neckline facing,
so we will have to cut it ourselves. To do this, measure the girth of the
neckline with a measuring tape.
6) По выкройке у модели нет обтачки для горловины,
поэтому нам придется выкроить ее самостоятельно. Для этого измерьте обхват
горловины сантиметровой лентой.

7)
Calculate the length of the neckline facing to the formula on the video.
Cut a strip
of the resulting length and a width of 5 cm from the main fabric.
7) По формуле на экране рассчитайте длину
обтачки.
Из основной ткани вырежьте полосу
полученной длины и шириной 5 см.

8) Sew the
ends of the facing in a short allowance.
8) Сшейте концы обтачки по короткому
срезу.

9) Iron the
seam. Fold the facing in half, with the wrong side inward.
9) Шов заутюжьте на одну из сторон. Сложите
обтачку пополам, изнаночной стороной внутрь.

Make 4 control marks at the same distance. This moment is shown in the video.
Сделайте 4 контрольные насечки на
одинаковом расстоянии. Этот момент показан на видео.

10) Fold
the neckline of the T-shirt and the facing together, matching the control
marks. Spread the free areas of the grind all over the neckline with the help
of pins.
10) Сложите вместе горловину футболки и обтачку,
совмещая контрольные надсечки. Свободные участки обтачки равномерно распределите
по всей горловине с помощью булавок.

11) Fasten
facing to the neckline by a hand seam and sew on the serger.
11) Приметайте деталь обтачки к горловине
и прошейте на оверлоке.

12) Carefully iron the seam, and then
iron it on the details of the T-shirt, being careful not to stretch the facing.
12) Аккуратно приутюжьте шов, а затем
заутюжьте его на детали футболки, стараясь не растягивать горловину.

13) The
kiper tape should pass along the back between the shoulder seams and cover the
seam. Lay the back part in front with the wrong side up. Tuck the end of the
kiper tape and pin it starting at the shoulder seam. Continue fixing the tape
along the entire back of the neck. Turn up the end of the tape in the same way
and secure it with a pin. This step is shown in the video.
13) Киперная лента должна проходить по спинке
между плечевыми швами и закрывать собой шов. Положите перед собой деталь спинки
изнаночной стороной верх. Подверните конец киперной ленты и приколите его, начиная у плечевого шва. Продолжайте фиксировать ленту вдоль всего шва горловины
спинки. Конец ленты аналогично подверните и закрепите булавкой. Этот шаг показан на видео.
14) You can
attach a keeper tape by a hand seam before stitch it on the sewing machine.
14) Для удобства можете наметать киперную
ленту к горловине, затем пришейте на швейной машине.
15) Similarly, fix the free side of the
kiper tape with pins between the
shoulder seams and statch by hand.
15) Свободную сторону киперной ленты
аналогично зафиксируйте булавками между плечевыми швами и наметайте.
16) Sew
along the kiper tape using the single side presser foot.
16) Проложите строчку по киперной ленте с помощью однорожковой лапки.
17) Fold
the front and back parts together face to face. Pin along the side seams,
combining the control marks.
17) Сложите детали спинки и переда лицом
к лицу и сколите по боковым швам, совмещая контрольные надсечки.

18) Sew the
side seam and then iron it toward the
back side.
18) Прошейте боковой шов, а затем приутюжьте и
заутюжьте его на сторону спинки.

19) Fold
inward the sleeve piece in half, then sew along the side seam.
19) Сложите деталь рукава пополам лицевой
стороной внутрь, а затем прошейте по боковому
шву.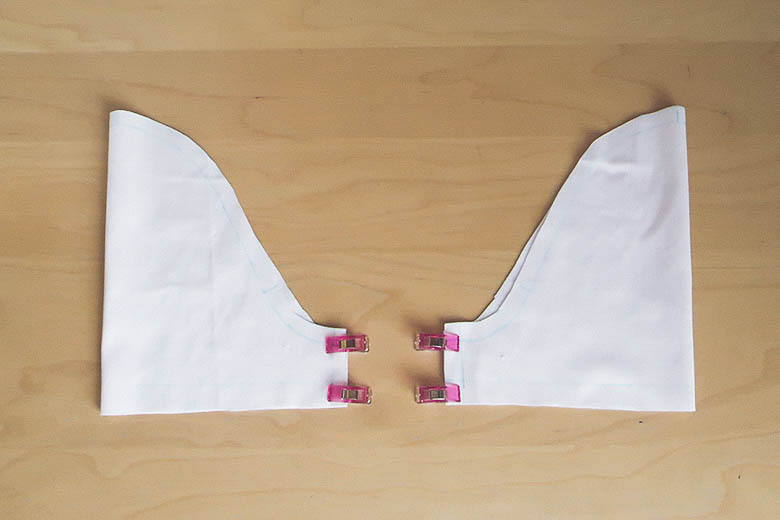
20) Do the
same with the second part of sleeve. Then
sew
on
the
serger.
20) Аналогичные действия проделайте со
второй деталью. Затем прошейте на оверлоке.
21) Iron
the seam toward to the back side.
21) Приутюжьте и заутюжьте шов на сторону спинки.
22) Pin
together the details of the T-shirt and sleeves, combining the control marks.
Sew the sleeves on the serger. Lay the stitch from the side of the sleeve.
22) Сколите вместе детали футболки и рукава,
совмещая контрольные надсечки. Вшейте рукава на овелоке. Строчку прокладывайте
со стороны рукава.

23) Then
iron the seam towards the sleeve.
23) Затем шов приутюжьте и заутюжьте на
рукав.

24) The hem
on the bottom of the T-shirt and sleeves will be 1.5 cm. To make the hem even,
mark with chalk from the bottom line 3 cm. Then fold the hem in half to the
marked line and fix it with pins.
On the side seams, make incisions and spread the allowance in different directions so that the sewing machine can easily sew this area.
24) Подгибка по низу футболки и рукавам будет
1,5 см. Чтобы ровно сделать подгибку, отметьте мелом от линии низа 3 см. Затем
подверните нижний срез пополам до отмеченной линии и зафиксируйте булавками. На боковых швах сделайте надрезы и разложите припуск в разные стороны, чтобы швейной машине было легче прошить этот участок.

25) Stitch
by hand the hem and sew flat felled seam on the coverlock or with a double needle
on the sewing machine.
25) Наметайте подгибку близко к срезу и
прошейте на коверлоке либо двойной иглой на швейной машине.

You
can sew a finishing stitch on a sewing machine using a twin needle. I will show
this method on a sample.
Вы можете сделать отделочную строчку на швейной машине с помощью двойной иглы. Этот способ я покажу на образце.

Serge along the raw edge of the hem. Iron the hem and
baste stitch by hand. Change the twin needle in the sewing machine according to
the instructions. Stitch on the right side at an equal distance, close to the
basting thread. Remove the basting thread
and iron. This step is shown in detail in the video tutorial.
Вы можете сделать отделочную строчку на швейной машине с помощью двойной иглы. Этот способ я покажу на образце.
Нижний край обработайте на оверлоке. Заутюжьте подгибку низа и
наметайте близко к срезу. Замените двойную иглу в швейной машине по инструкции.
Проложите строчку по лицевой стороне на одинаковом расстоянии близко к
наметочной нити. Удалите наметочную нить и проутюжьте. Этот шаг подробно показан в видео уроке.

26) T-shirt is ready!
26) Футболка готова!
26) Футболка готова!
The process of sewing any T-shirt is the same and is not fundamentally different, therefore, using this tutorial, you can always sew a T-shirt of the desired color and size. If you have any questions, then write them in the comments, I will definitely answer them.
Процесс пошива футболки одинаков и принципиально не отличается, поэтому, используя этот мастер-класс, вы всегда сможете сшить футболку нужного цвета и размера. Если у вас возникнут вопросы, то пишите их в комментариях, я обязательно на них отвечу.
Процесс пошива футболки одинаков и принципиально не отличается, поэтому, используя этот мастер-класс, вы всегда сможете сшить футболку нужного цвета и размера. Если у вас возникнут вопросы, то пишите их в комментариях, я обязательно на них отвечу.
xoxo, Stacy
Комментариев нет
Отправить комментарий